Using VMWare ESXi 8 and vCenter 8 in your homelab for free
Walkthrough for getting VMWare vSphere ESXi 8 and vCenter 8 running on your homelab using the 60 day free evaluation license.
This is part 1 of a multi-part series. Part 2 is Creating VMs for Kubernetes Using Terraform and VMWare vSphere
The goal of this series
This series is for you if you are interested in making management of your homelab something more turn-key. It is also for you if you are looking for something to help get hands-on experience to move from hobby tinkering to tools used in the workplace for managing infrastructure like Kubernetes clusters.
The series is an end-to-end walkthrough from installing ESXi on bare metal up to having homelab tools (Jenkins, Kubernetes dashboard) running in a Kubernetes cluster using infrastructure as code practices to allow you to spin up and manage this whole setup through terraform and ansible.
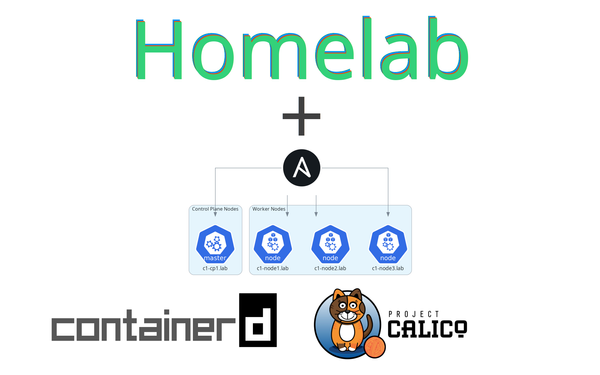
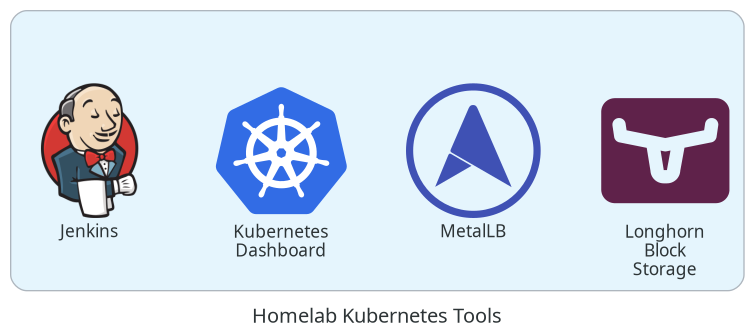
The end-state Kubernetes cluster we will be creating will have some developer-focused tools deployed which will be described in more detail in part 4. All tools are deployed from code.
Series Notes
To keep this series managable, I will skip over basics of why and how to use tools like terraform and ansible - this series will jump right in using the tools. If you are coming without a basic understanding of those tools, I would suggest running through some tutorials. There are fantastic write ups for those elsewhere.
This is a walkthrough that is meant to be adapted to your network design and hardware. It is best suited for those that have a single homelab machine where ESXi will be installed directly on the hardware and a vCenter instance will be started up within the ESXi host. Also, it should go without needing to say it, but this is not production grade - things like valid tls certificates are not included.
This guide
At the end of this guide, we will have a vSphere install in our homelab that will be the foundation of everything else to come. For this guide, you will need to have an account created with vmware. A free account is all that is needed for this series. Create an account at vmware.com
This part of the series is probably the least of the set in regards to IaC since it deals with bootstrapping physical hardware and is also likely the least interesting of the series. At some point, I will come back and clean up the last few things to remove the manual cli steps relating to vCenter. Stick with the series and it should get a lot more interesting.
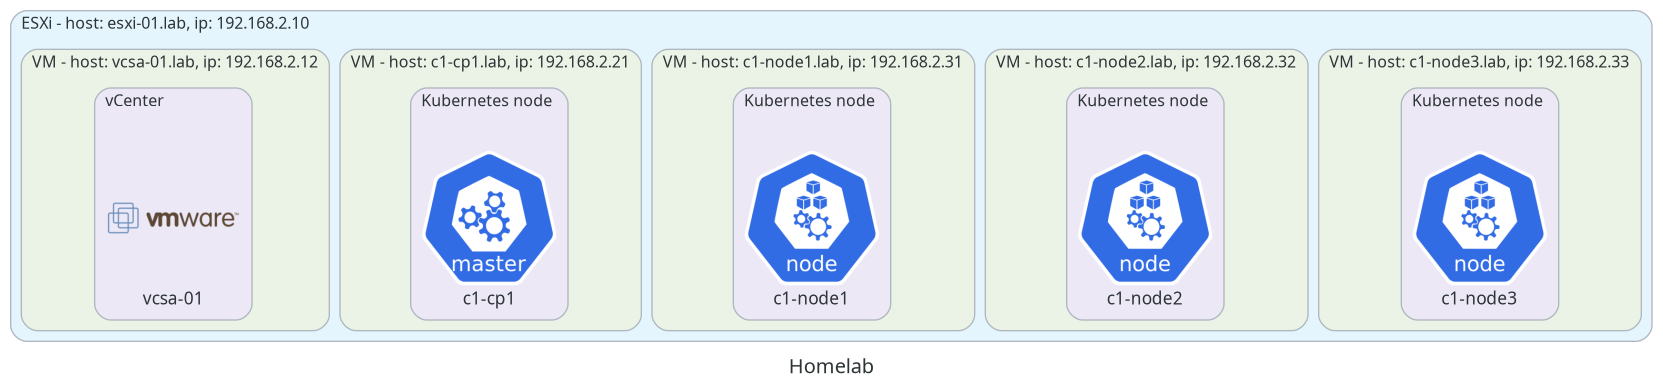
Infrastructure Overview
Homelab hardware
The hardware I am running on for this series is all consumer pc parts:
- CPU: AMD Ryzen 5 5700*
- Memory: 64GB DDR4*
- Storage: 1TB Samsung 970 nvme
*CPU - For a good experience, please have a cpu with at least 10 cpu threads/cores. With 4 Kubernetes nodes and vCenter running, anything less will be extremely cpu-constrained
*Memory - Less than 64GB is fine. The series should work as-is with 32GB. Anything less will require small tweaks to VM definitions for the amount of memory we allocate to the Kubernetes nodes in the second part of this series.
Things we will be creating
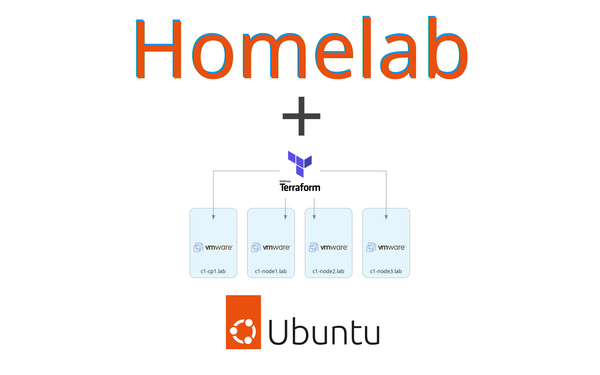
The infrastructure that will be created as a result of this entire series is as follows:
With all that intro out of the way, let's get building.
Guide
- Get companion code
- (optional) Setup local DNS
- Install ESXi 8
- Installing vCenter on an ESXi host or Installing vCenter from Windows
- Finish settings up vCenter
- Wrap Up
Get companion code
The code this guide uses is available at https://github.com/markperdue/vsphere-setup. Clone the companion code repo to have the best experience following along.
(optional) Setup local DNS
Unless you really like memorizing ips, you should probably setup a basic dns server or something equivalent to handle our .lab domains. Skipping this step should have no technical impact on the operation of anything but will require you to replace a number of references in the config throughout this series. Essentially, any place you see any of the following values, you should replace the value with the ip
esxi-01.labvalues should be replaced with192.168.2.10vcsa-01.labvalues should be replaced with192.168.2.12
DNS records for ESXi and vCenter should be setup before running the installer for both forward and reverse dns lookups. Currently, I run dnsmasq in a container with a very basic config file and it has been running great:
address=/esxi-01.lab/192.168.2.10
address=/vcsa-01.lab/192.168.2.12

ptr-record=10.2.168.192.in-addr.arpa., esxi-01.lab
ptr-record=12.2.168.192.in-addr.arpa., vcsa-01.lab
A previous method I used that I'll include here is for anyone using edgeos on a ubiquiti router and wishing to use static host mapping
EdgeOS A record creation
- SSH to router
- Setup static host mapping, save changes, and exit
# sshed into edgeos router
configure
set system static-host-mapping host-name esxi-01.lab inet 192.168.2.10
set system static-host-mapping host-name vcsa-01.lab inet 192.168.2.12
commit
save
exit
Install ESXi 8
Let's install ESXi directly on our hardware and use it as our hypervisor.
- Download the ESXi 8 iso image from wmware [site]
- Verify the sha256 checksum of the downloaded image against the stated checksum
$ sha256sum VMware-VMvisor-Installer-8.0-20513097.x86_64.iso 78b8ee5613019f8d92da2b74fae674707679379803cb7b01b526747a849138c1 VMware-VMvisor-Installer-8.0-20513097.x86_64.iso - Write ESXi iso to a flash drive (take care with replacing /dev/sda device with your device as this command is potentially data destructive)
$ sudo dd bs=4M if=VMware-VMvisor-Installer-8.0-20513097.x86_64.iso of=/dev/sda conv=fdatasync - Boot homelab system from flash drive to start installer
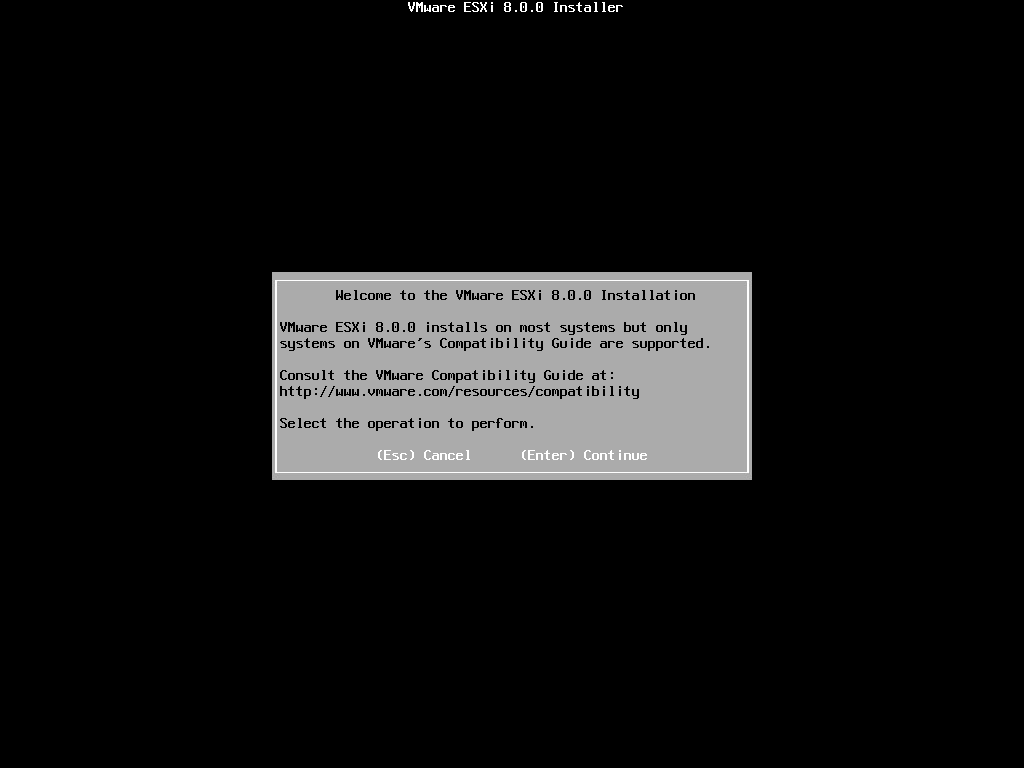
- Accept the license agreement by pressing
F11 - Select the disk you would like to make available within ESXi as a VMFS datastore

- If the disk already has a VMFS datastore, choose whether to upgrade, install, or overwrite the datastore.
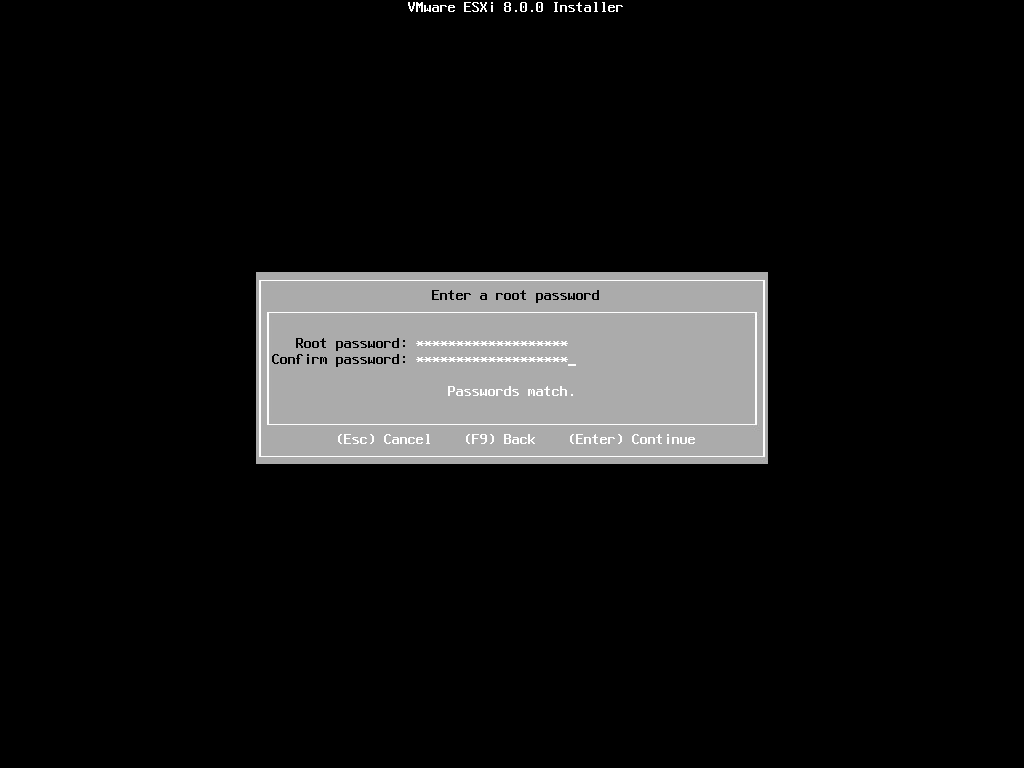
- Set a root password or use the example password we will use throughout this series
changethisP455word!. If you use a custom password, be sure to update the config files in later steps
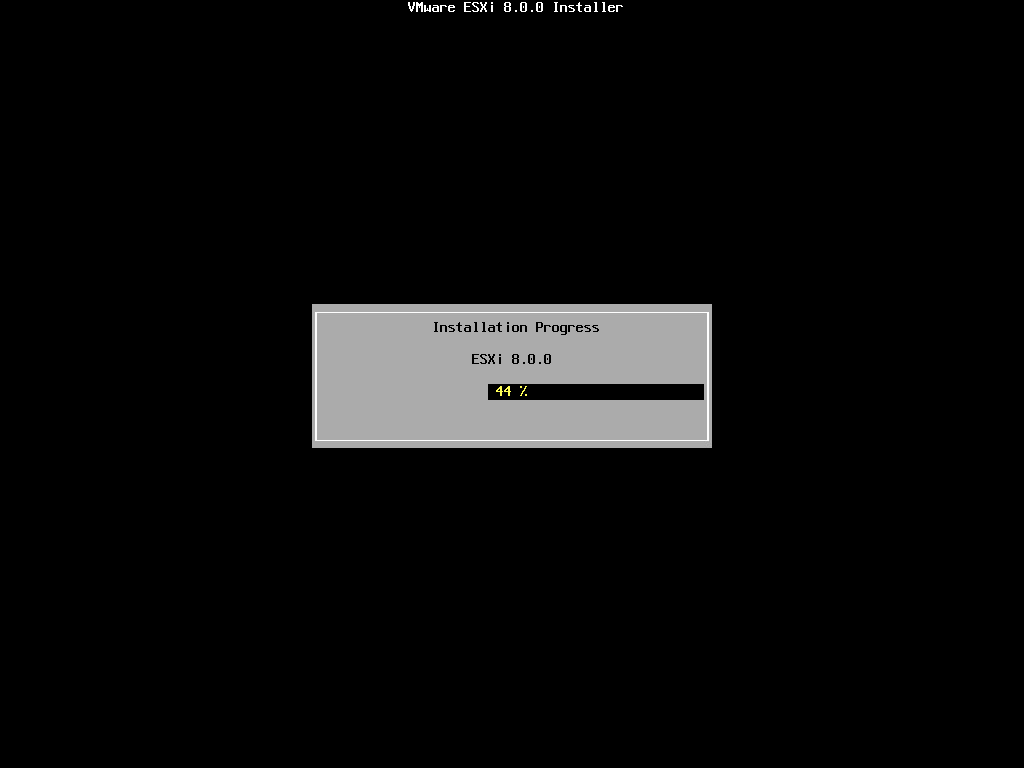
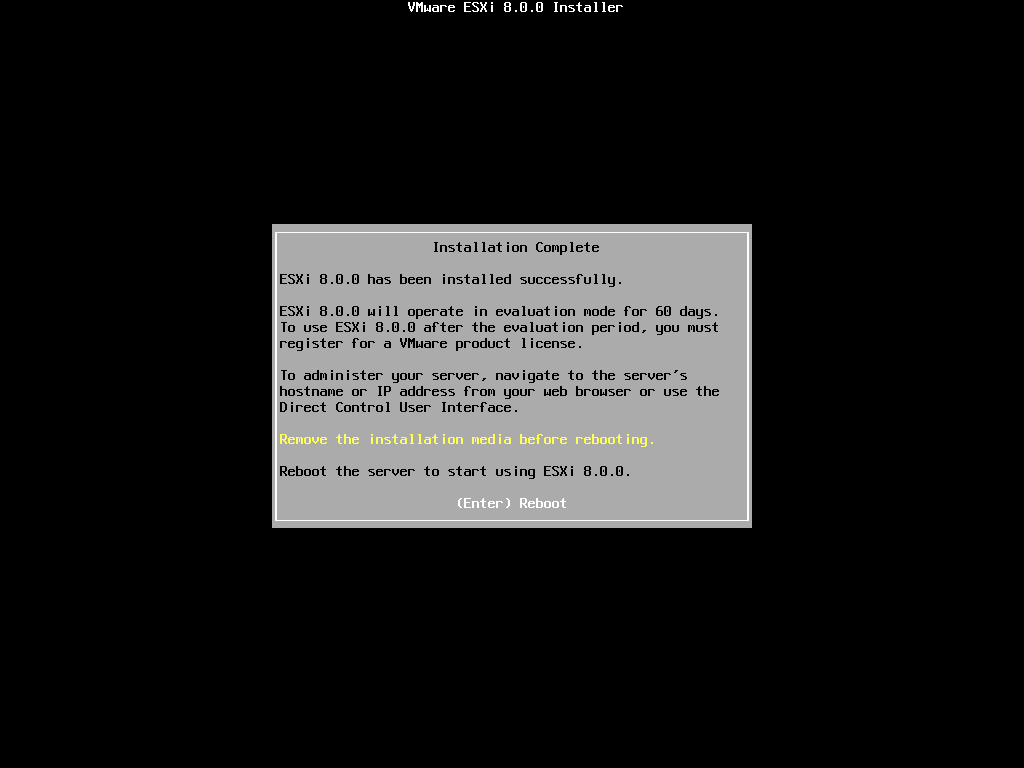
- Confirm the install by hitting
F11when prompted and wait for the install to complete
- Remove the install media and hit
Enterto reboot when prompted
- After reboot, hit
F2when ESXi has loaded to customize the system - Enter
rootas username andchangethisP455word!as password - Select
Configure Management Networkand hitEnter - Select
IPv4 Configurationand update the configuration to use a static address of192.168.2.10and hitEnterwhen done - Select
DNS Configurationand update the DNS servers if neccessary. Set the hostname value toesxi-01.laband hitEnterwhen done - Hit
Escand then hityto apply the networking changes - Exit out of ESXi management by pressing
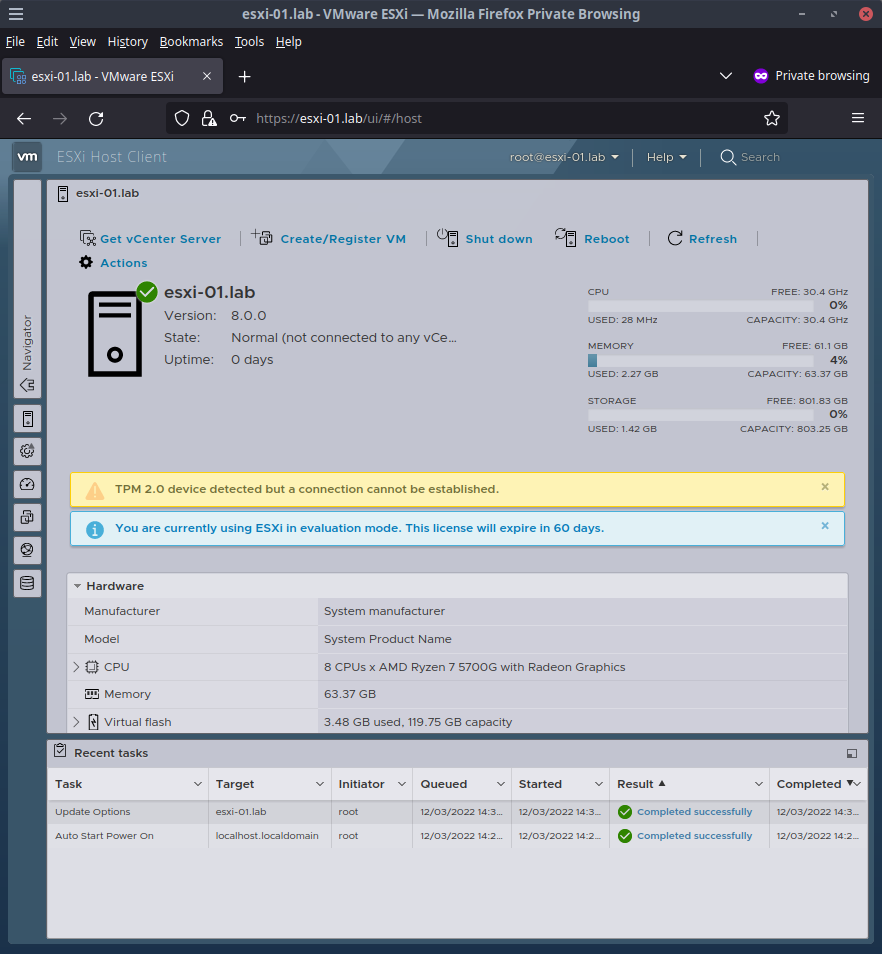
Esc - Launch https://esxi-01.lab on a different computer than the ESXi host and test a login with
rootandchangethisP455word!

- After logging in, you are greeted with your working ESXi instance
Installing vCenter on an ESXi host
vCenter is the management layer we will be using for our ESXI host so let's install it as a server appliance within the ESXi host we created for our homelab. In the next guide, we will be using the vSphere terraform provider to manage our virtual machines so let's get vSphere vCenter installed. vCenter requires a lot of memory to run, 14GB by default, so if that is a concern based on your available homelab I have a tip - things seem to work for our terraform use case by setting the vCenter VM to use as little as 4GB memory - albeit things start up much slower. If you have the memory to spare, keep things as they are by default.
For installing vCenter, we will focus on using their cli-based installer with a config file that would generally be placed into git for source control. This piece is one of the last pieces this series does not have automated, but until then, here are the manual steps.
-
Download the vCenter 8 iso image from wmware [site]
-
Verify the sha256 checksum of the downloaded image against the stated checksum
$ sha256sum VMware-VCSA-all-8.0.0-20519528.iso 6f9a0691ee649f4e59fd961790d42367cad9bbbc0652070e893e209c95d969c5 VMware-VCSA-all-8.0.0-20519528.iso -
Extract iso to disk and navigate to
vcsa-cli-installer/lin64 -
If your running with the same infrastructure design as mentioned earlier, no changes should be needed to examples/vsphere-cli.json. Otherwise, edit the file with changes related to your network design and configuration. For details on the options see vmware's configuration details
# example file from companion code repo { "__version": "2.13.0", "new_vcsa": { "esxi": { "hostname": "esxi-01.lab", "username": "root", "password": "changethisP455word!", "deployment_network": "VM Network", "datastore": "datastore1" }, "appliance": { "thin_disk_mode": true, "deployment_option": "tiny", "name": "vcsa-01.lab" }, "network": { "ip_family": "ipv4", "mode": "static", "system_name": "vcsa-01.lab", "ip": "192.168.2.12", "prefix": "24", "gateway": "192.168.2.1", "dns_servers": [ "192.168.1.10" ] }, "os": { "password": "changethisP455word!", "ntp_servers": "time.cloudflare.com", "ssh_enable": false }, "sso": { "password": "changethisP455word!", "domain_name": "vsphere.local" } }, "ceip": { "settings": { "ceip_enabled": false } } } -
To catch any issues with our configuration before we run the install, let's use the built-in config validators. Run the following commands and accept the warning about invalid ssl certs by typing
1and thenEnter./vcsa-deploy install --accept-eula --acknowledge-ceip --verify-template-only ./examples/vsphere-cli.json ./vcsa-deploy install --accept-eula --acknowledge-ceip --precheck-only ./examples/vsphere-cli.json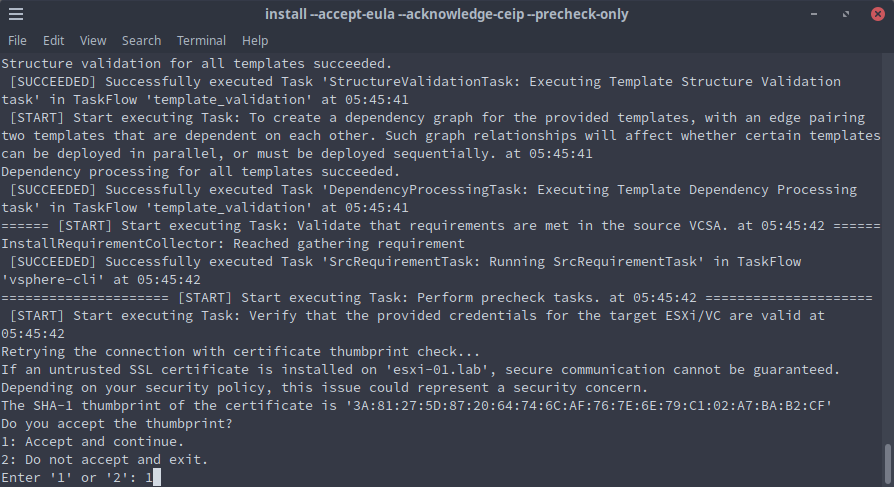
-
If there were any error messages related to ovftool being not found, it is likely you need to install the dependencies:
- ovftool
libcryptpackage (Arch:yay -S libxcrypt-compat)
-
Install vCenter
./vcsa-deploy install --accept-eula --acknowledge-ceip ./examples/vsphere-cli.json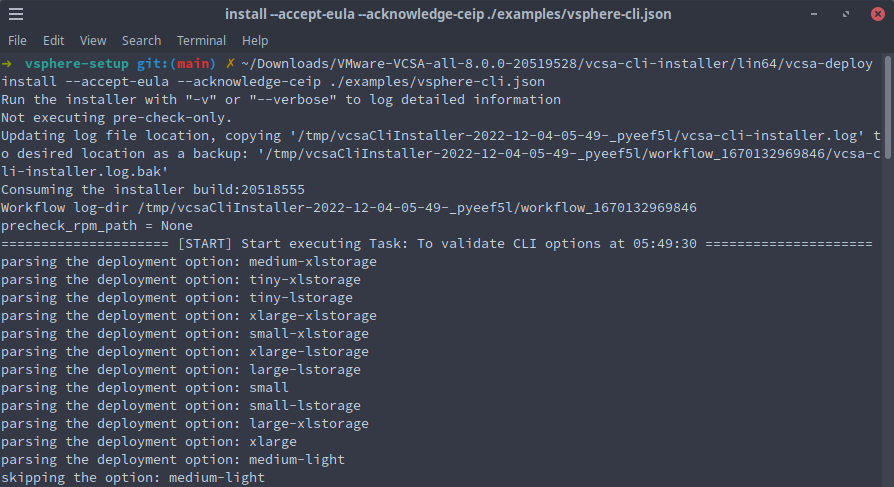
-
Accept the warning about invalid ssl certs by typing
1and thenEnter -
After 10 or 20 minutes, the installer should complete
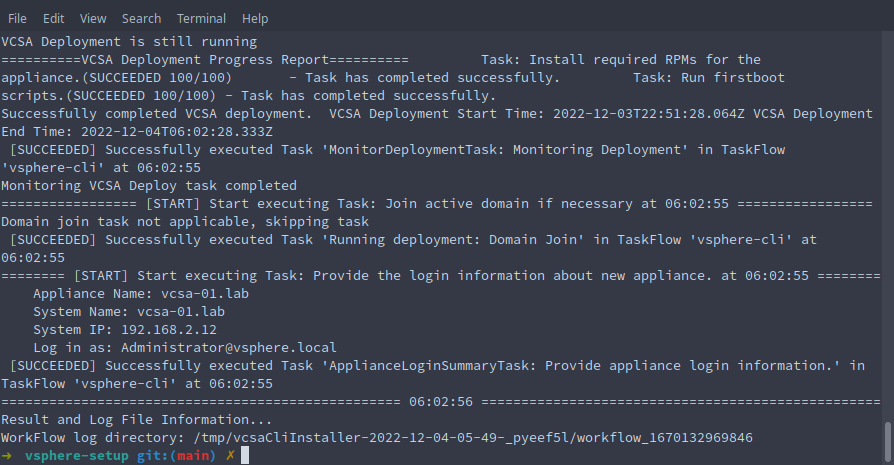
-
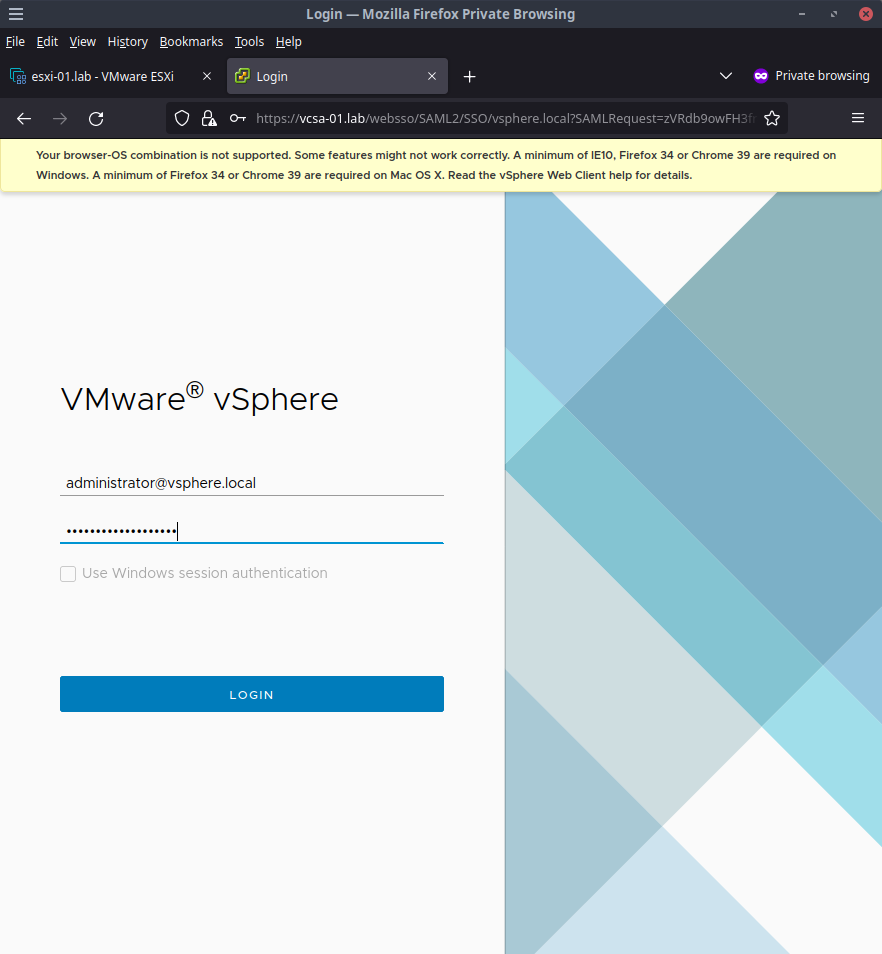
Open https://vcsa-01.lab and click the button to
Launch vSphere Clientand login withadministrator@vsphere.localandchangethisP455word!
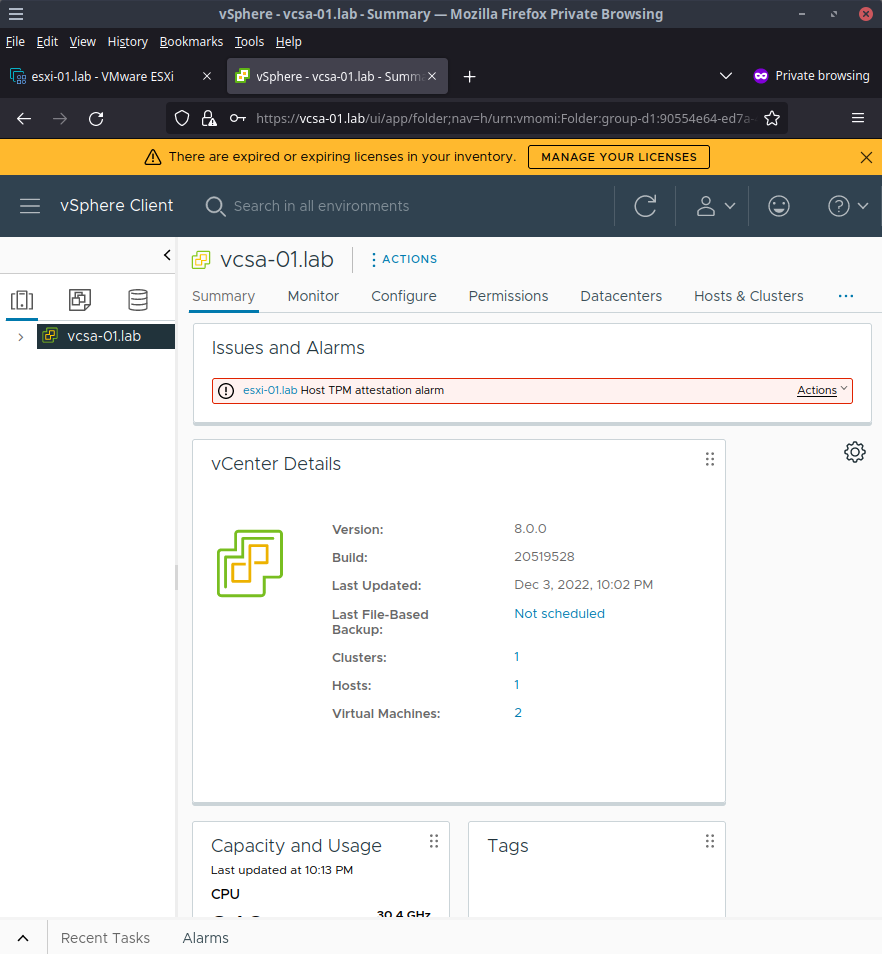
-
After login, we are greeted with our ready to use vCenter instance
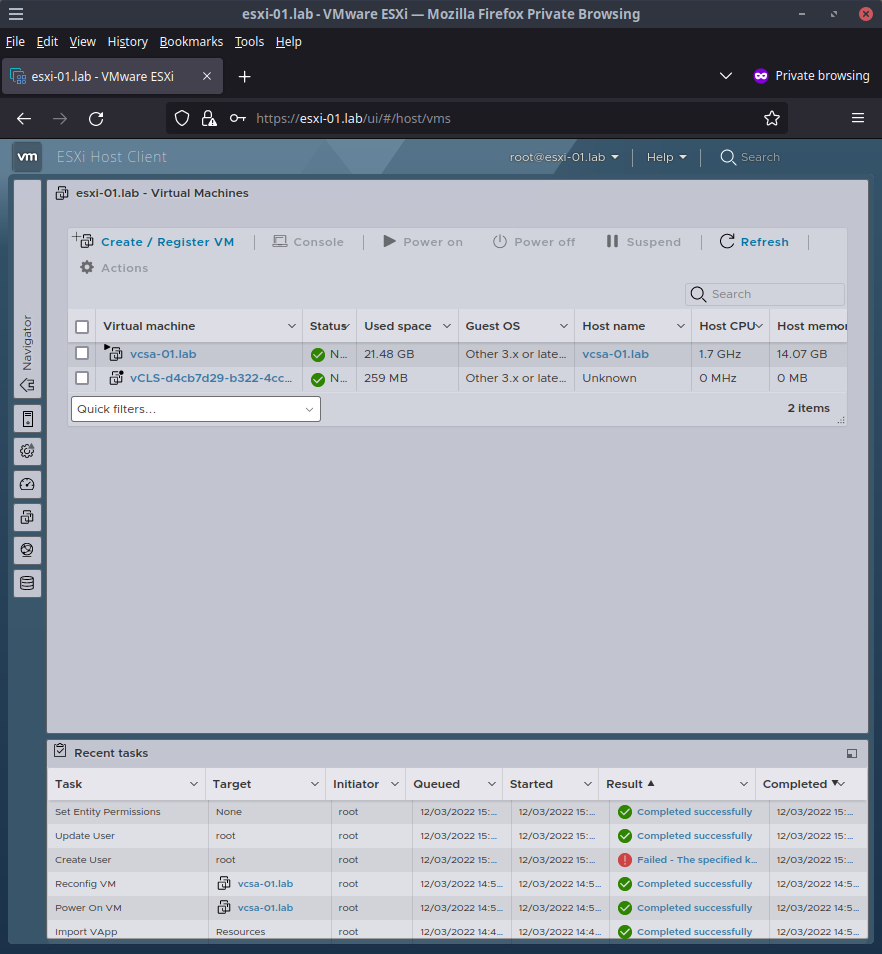
-
Our esxi-01 host can also be launched where we would see our vCenter server appliance running as a VM
Finish settings up vCenter
NOTE: There is an issue in the 8.0 release of vCenter that impacts DNS resolution of vCenter to our ESXi host causing things that we will need (like deploying an OVF template) to not work. Another homelab user ran into the same issue and wrote up an article about it as well. This will hopefully be fixed in a future release but until then, the fix is to restart the dnsmasq server built in to vCenter which I will detail below but to do that we need to also enable shell management via ssh in vCenter
- Launch https://vcsa-01.lab:5480 to access vCenter server management
- Log in with admin creds
administrator@vsphere.localandchangethisP455word! - Click
Accesspage and clickEditin the top right of the window - Toggle
Activate BASH Shellto on and set a value of10forTimeout (Minutes)field and clickOk. The shell will be auto-disabled after this 10 minutes timeout window - Open a terminal window to ssh into our vCenter instance
ssh administrator@vsphere.local@vcsa-01.lab VMware vCenter Server 8.0.0.10000 Type: vCenter Server with an embedded Platform Services Controller (administrator@vsphere.local@vcsa-01.lab) Password: - Enter
changethisP455word!when prompted and typeshellto launch a bash shellConnected to service * List APIs: "help api list" * List Plugins: "help pi list" * Launch BASH: "shell" Command> shell - Verify whether the issue is impacting your setup by trying to resolve
esxi-01.labthrough the host commandsso-user@vcsa-01 [ ~ ]$ host esxi-01.lab Host esxi-01.lab not found: 3(NXDOMAIN) - Escalate our user to root and enter the same
changethisP455word!password when promptedsso-user@vcsa-01 [ ~ ]$ sudo su - - Enter a bash shell again by typing
shellCommand> shell - Restart
dnsmasqroot@vcsa-01 [ ~ ]# service dnsmasq restart - Recheck that
host esxi-01.labcan now resolve to192.168.2.10host esxi-01.lab esxi-01.lab has address 192.168.2.10 - Exit the root and ssh session by pressing
Ctrl-Da few times until the connection tovcsa-01.labis closed
Terraform
Now we are ready to use terraform to manage a few resources using the vSphere terraform provider mentioned earlier. To get things ready for the second guide, we'll need to create some vSphere resources that we will need to reference later - a data center, and a cluster object.
Let's create these things and also associate our ESXi host to the cluster object. See main.tf for details.
- In a terminal, navigate to where the companion code repo was checked out to
- Edit examples/terraform.tfvars, if needed, with changes related to your network design and configuration
# example file from companion code repo vsphere_user = "administrator@vsphere.local" vsphere_password = "changethisP455word!" vsphere_server = "vcsa-01.lab" vsphere_datacenter = "Datacenter" vsphere_cluster = "Cluster" host_hostname = "esxi-01.lab" host_username = "root" host_password = "changethisP455word!" - Create a terraform workspace and init our plan
terraform workspace new vsphere
terraform init
- Looking at the companion code repo's main.tf file we can see we are going to creates 3 resources using the vsphere terraform provider
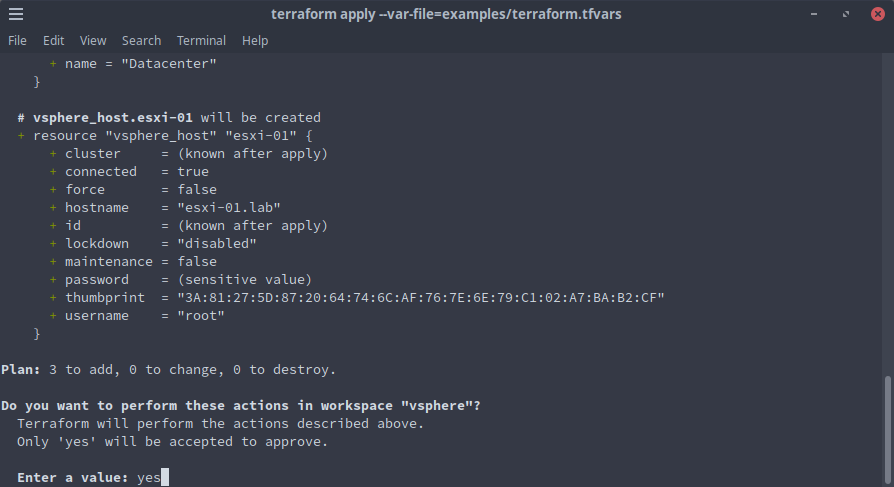
provider "vsphere" { user = var.vsphere_user password = var.vsphere_password vsphere_server = var.vsphere_server allow_unverified_ssl = true } resource "vsphere_datacenter" "vsphere_datacenter" { name = var.vsphere_datacenter } resource "vsphere_compute_cluster" "compute_cluster" { name = var.vsphere_cluster datacenter_id = vsphere_datacenter.vsphere_datacenter.moid host_managed = true } resource "vsphere_host" "esxi-01" { hostname = var.host_hostname username = var.host_username password = var.host_password cluster = vsphere_compute_cluster.compute_cluster.id thumbprint = data.vsphere_host_thumbprint.this.id } - Have terraform apply the plan with our
tfvarsconfiguration fileterraform apply --var-file=examples/terraform.tfvars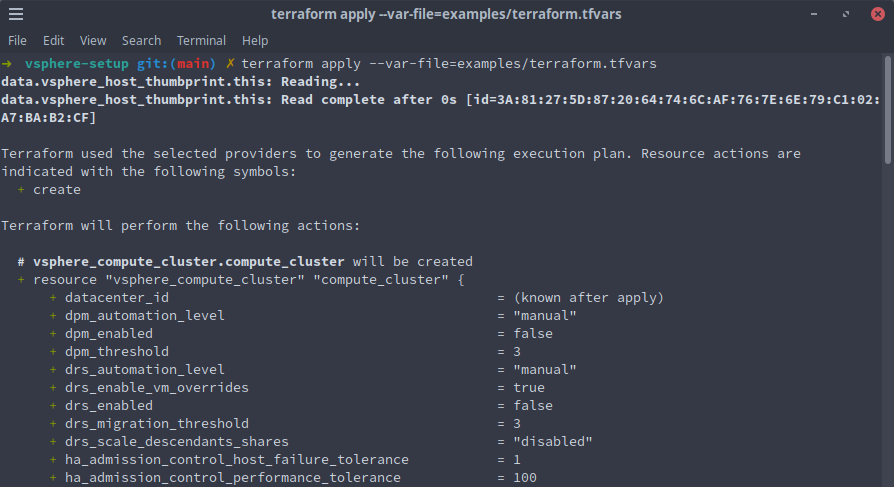
- Terraform will detect our current infrastructure does not match our definition and that to match our definition, 3 resources - a datacenter, cluster, and host resources - need to be created. Type
yesand hitEnterafter confirming the displayed info
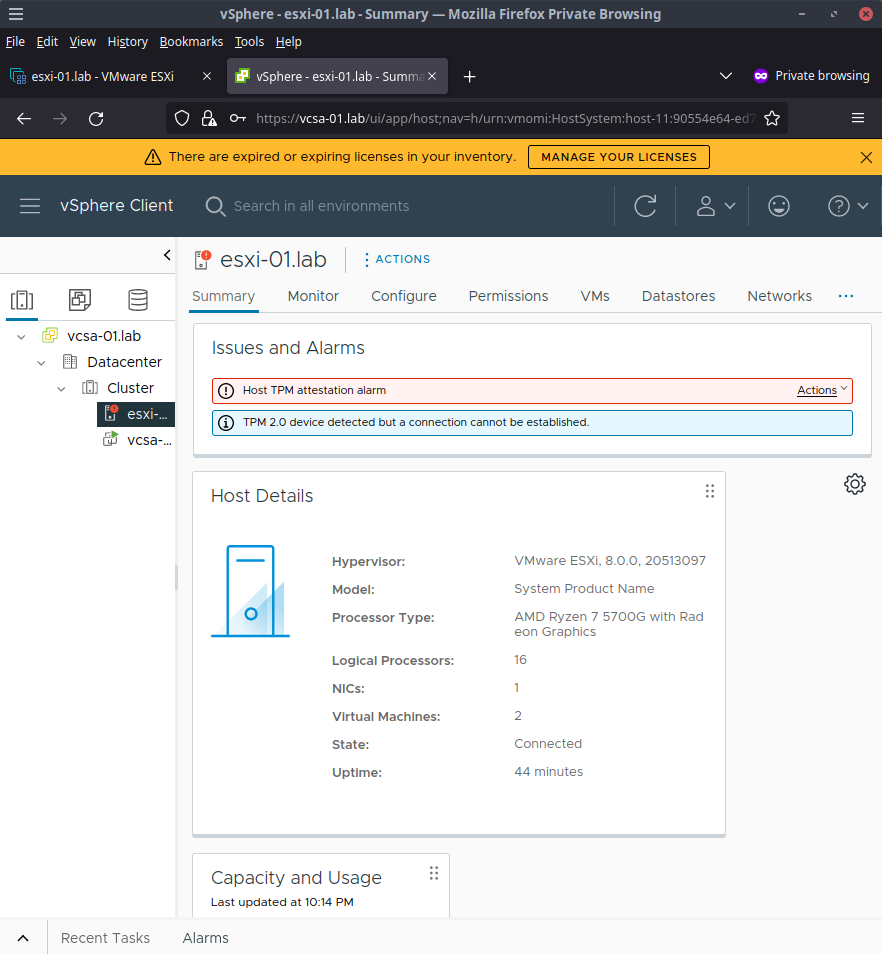
- We can verify the terraform resources were created by visiting https://vcsa-01.lab. The new resources should be visible in the datacenter panel
Wrap Up
You should now have a working ESXi machine that is running an instance of vCenter.
- ESXi host should be available by logging in at https://esxi-01.lab with the example user
rootand passwordchangethisP455word! - vCenter host should be available by logging in at https://vcsa-01.lab with the example user
administrator@vsphere.localand passwordchangethisP455word!
Note - Certificate issues are expected for the above urls as we are using a .lab domain. A future update to the guide might improve this.
The next part of this series will continue with steps to create the virtual machines we will use for our Kubernetes cluster. Continue with part 2 at Creating VMs for Kubernetes Using Terraform and VMWare vSphere